
One of the features that is really essential for creating more complex scenes is the Layers menu. It allows you to quickly select, manage and organize 3D objects in your scene, including creating groups of objects which you can manipulate as a single unit. Let's start learning about how to make the best use of this powerful feature!
Open the Layers menu
- In 3D editor, tap on the "Main Menu" button
 in the top left corner to bring up the list of menus.
 - Choose Layers Menu
 from the list.
Layer and Group
Before we look at what we can do with layers and groups, let's first learn two important concepts: layer and group. If you use other 2D graphics software such as Photoshop, you are probably already familiar with these concepts. Similarly, in Magic Poser every 3D object is represented by a layer in the Layers menu. You can also create groups from layers and manipulate them (for example, move, rotate and scale) as a single unit. For example, you can build a table using five 3D objects: a top panel plus four legs. You can group these 5 objects together in the Layers menu, and move the whole table at once, instead of moving each individual pieces one by one!
In this tutorial, we will use a sample scene we made that contains our Elle 3 model (a layer), a chair (a layer) and a table (a group). We will cover how to create a group in the next tutorial: How to use groups.
Anatomy of the Layers menu
Let's walk through the different parts of the Layers menu:
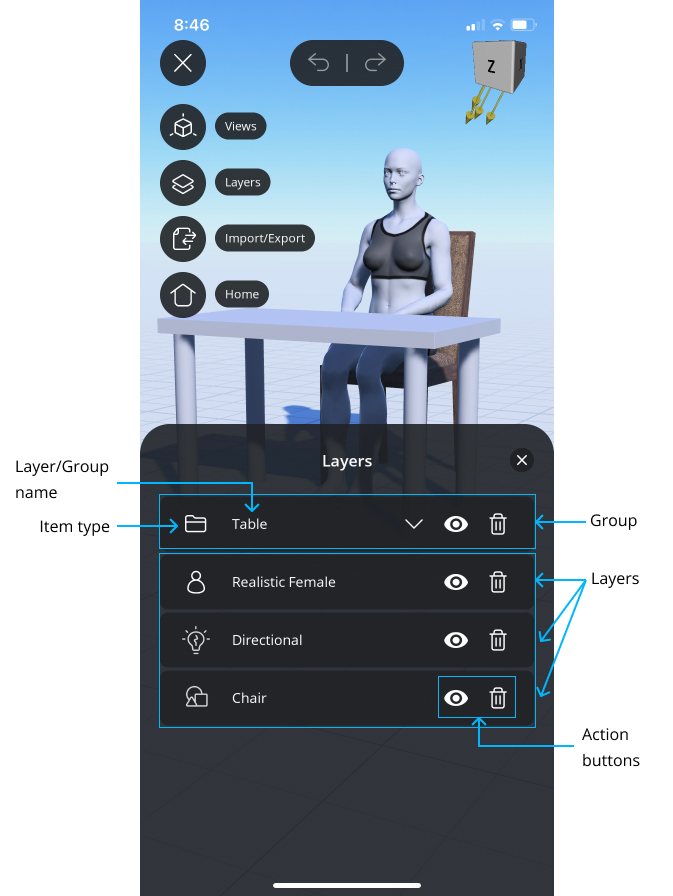
- The Item type icon shows the type of the item. Here's a list of the icons and their corresponding item types:
 : Character
 : Prop
 : Light
 : Group
- The layer/group name is shown next to the item type icon. You can give your layer/group a more descriptive name than the default name by renaming your layer/group.
- The action buttons are the actions you can apply to the layer or the group. For example, you can hide or delete a layer/group. We will also go over that later in this tutorial.
Common actions for layers and groups
You can apply many common actions to both layers and groups. Let's take a look!
Selection and deselection
You can select a layer/group in both the Layers menu and in the 3D scene by tapping on the corresponding row in the Layers menu. To deselect a layer/group, tap on the row again. Notice how the corresponding 3D objects are highlighted in the scene when you select different rows in the Layers menu:
Actually, you can also select an object or a group of objects in the 3D scene and the corresponding row in the Layers menu will be selected (highlighted in blue) as well:
Visibility
You can hide and show a layer/group by tapping on the visibility button  . When you hide a layer/group, the corresponding object(s) will be hidden in 3D scene. Note that when a layer is hidden, the visibility button changes to
  .
.

Deletion
You can delete a layer/group by tapping on the delete button  . The corresponding object(s) in the 3D scene will be deleted.

Renaming
- Tap on a layer or a group to select it.
- In the row of buttons that shows at the bottom of the screen, tap on "Rename".
- Enter the desired name in the input dialog that pops up.
- Click "Save".
- If the renaming is successful, the success dialog will show up, click on "OK".
The following example shows how you can rename the group "Table" to "Desk".
Comments
0 comments
Please sign in to leave a comment.