
Being able to group multiple 3D objects together is a powerful feature when building more complex scenes. Magic Poser allows you to create and manage groups in the Layers menu.
How to create a group
- From the layers menu, tap to select all the layers you want to group.
- Tap on "Group" button
 in the list of buttons that show up at the bottom.
 - In the dialog that pops up, enter a name for the new group.
- Tap on "Save".
- If creating the group is successful, the success dialog will show up. Tap on "OK".
- You will see the newly created group show up in the Layers menu with a group icon
 in front of the group name.
The following example groups a scaled cube and four cylinders together to create a table.
Please note Magic Poser currently only supports one level of grouping, which means that you can create groups from layers, but not groups from groups. If you try to group two groups together, all items in both groups will be moved into a new group, and the two original groups will be deleted.
How to expand and collapse a group
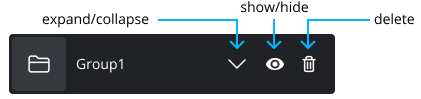
There are three action buttons for a group: expand/collapse, show/hide and delete. We have covered how to show/hide and delete a group or a layer in our previous tutorial. Now let's learn how to expand/collapse a group!
Expand a group
- To reveal all layers that belong to a group, tap on the expand button
 located at the right hand side of the row.
 - You will see all layers show up with an indent under the group. The expand button changes into a collapse button
 .
.
Collapse a group
- To hide all layers that belong to a group, tap on the collapse button .
- All layers will be hidden and only the group will show in the Layers menu. The collapse button changes into an expand button .
The following example shows expanding and collapsing a group:
How to ungroup a group
- Tap to select the group that you want to ungroup.
- Tap on "Ungroup" button
 in the list of buttons that show up at the bottom.
 - You will see all the layers of the group now being displayed without the indent, like other ungrouped layers. The original group is automatically deleted.
How to move a layer in and out of a group
You can also move a single layer into any existing group or out of the group. To do that:
- Tap to select the layer you want to move.
- Tap on "Move" button
 in the list of buttons that show up at the bottom.
 - In the dialog that pops up, choose the destination that you want to move the layer to. Click on "Move" to confirm.
The following example shows how to move the top panel of the table into the "Table" group, which already has the four legs in the group. You can see that before the top panel is moved into the group, selecting the "Table" group only highlights the 4 legs in the 3D scene. After the top panel has been moved into the group, selecting the "Table" group highlights the whole table.
Comments
0 comments
Please sign in to leave a comment.